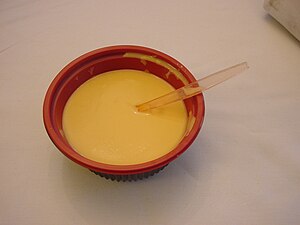
Pumpkin Soup with Curry

A bowl of pumpkin cream soupImage via WikipediaThis recipe featured in the CoastViews Magazine Blog and was brought to my attention by Monique, a Facebook friend.  I tried it for the first time last week and, while it didn’t hit the palate as we were anticipating (more on that in a bit), it’s still a very delicious soup.

You’ll need:
3 tablespoons butter
1 medium sweet onion, chopped
4 medium carrots, chopped
3 medium ribs celery, chopped
1 clove garlic, minced
1 1/2 cups vegetable broth
1 1/2 teaspoons curry powder, or to taste
1/2 teaspoon salt, or to taste
Dash fresh ground black pepper2 tablespoons fresh parsley, or 2 teaspoons parsley flakes
3 cups mashed pumpkin, fresh if possible
2 cups half-and-half or 1 1/2 cups milk and 1/2 cup heavy cream
Parsley or chives for garnish (optional)

Directions:
In a large saucepan, melt butter over medium-low heat.  Saute’ chopped vegetables until just tender.  Add garlic and vegetable broth and simmer for 20 minutes.

Add curry powder, salt, pepper, parsley and pumpkin.  Stir cream until well blended.  Working in batches, blend until smooth and pour back into the saucepan.  Heat through; add more salt and curry powder as needed.  Garnish with chopped parsley or a few roasted, seasoned pumpkin seeds.

I made this in my Dutch oven, just to make sure it all fit in one pot.  I added an additional teaspoon of curry, which was a bit much.  I’ve found that ground clove balances the curry without making the soup taste too much like pumpkin pie.  I’d recommend starting with 1/8 teaspoon ground cloves for the whole batch and adjusting to taste from there.  This soup is awesome for cool Autumn nights, and I trimmed a bit more fat by using 1% milk, as opposed to the cream or half-and-half.  It doesn’t taste as rich as it might, but it’s still very tasty.

The flavor threw us a bit at first, because we’re all used to a butternut harvest soup I make as often as possible in the Fall and Winter.  That soup contains sweet potato and apple, among other goodies, and I season it with allspice, cumin, cinnamon and nutmeg, so it’s got a bit of a sweeter spicy taste.  I think all of us were looking at the soup, noticing the color and texture and expecting it to taste the same.
I hope your family and you enjoy this treat!

Enhanced by Zemanta

Pumpkin Treats

I whipped up another batch of pumpkin doozies today; after all, I had to find something to do with the leftover cream cheese frosting.  I made the original batch with whole wheat flour, since that’s what we have in the canister.  They were a gorgeous brown and had a rich flavor as the nuttiness of the flour accented the pumpkin.

We’re running low on whole wheat flour and I didn’t feel like a run to the store, so I decided to use self-rising flour, which only comes in white in our house. This batch was significantly lighter colored, doesn’t have quite the same flavor but tastes a bit like pumpkin shortbread. Mmmmm mm! I haven’t tried one of the sandwiches in this batch, yet, but my daughter did. Her verdict? “They’re good, but next time, use store-bought frosting.” I wonder if she realizes it’s the same batch of frosting she enjoyed so much in the last batch of cookies?
 I got the recipe off of Allrecipes, so I can’t claim credit for it.  It’s very easy to make, so whip some up and enjoy!
You’ll need:
1 stick (1/2 cup) butter
1 cup of sugar
1 cup pureed pumpkin
1 egg
1 tsp vanilla
2 cups flour
1 tsp baking soda
1 tsp baking powder
1/2 tsp salt
1 tsp cinnamon
1/4 tsp ground clove
1.  Preheat oven to 350 deg F.  Line cookie sheet with parchment paper.
2.  Cream together the butter and sugar.  Add  pumpkin, egg and vanilla; mix well.
3.  Stir in flour, baking soda, baking powder, salt and cinnamon.  (If you use self-rising flour, omit the baking soda, baking powder and salt.)
4.  Drop onto parchment paper-lined cookie sheet.  Bake for 12-14 minutes and let sit for 1 minute before transferring to wire cooling racks to cool.
 
Cream Cheese Frosting (also from Allrecipes.com)
You’ll need:
8 ounces cream cheese, softened
1/4 cup butter, softened
1 cup sifted confectioners’ sugar
1/2 teaspoon vanilla extract
In a medium bowl, cream together the cream cheese and butter until creamy.  Mix in the vanilla, then gradually stir in the confectioners’ sugar.  Store in the refrigerator after use.

Enhanced by Zemanta

Bottom Lining It

Image representing Twitter as depicted in Crun...Image via CrunchBaseAlright.  It’s taken me a while, but I simply have to confess, I’m sucking at this blogging thing lately.  What is it?  Time?  Maybe.  Lack of things to talk about?  Yeah, more than likely.  I’d say that both of these are hindered by my laptop being out of commission.  It’s like this:  I’m the world’s worst for not turning it off.  I’m homeschooling my older daughter all day, squeezing in some soapmaking after school’s over, darting into the office to update my Facebook or Twitter streams or, on occasion, fixing or upgrading something on my website.  Do y’all really want to hear about that stuff?  Probably not.

Back to the whole “not turning it off” thing.  I love my laptop and our home’s wifi connection because they enable me to watch my shows in the evenings and still get some of my computer work done.  They can also allow me to work on blogs and so forth while I sit in the living room as my daughter works.  Unfortunately, until I can get a new cord for my laptop, neither of those things is happening.  Soon!  Hopefully soon!

Besides my lack of blogs lately, what has been keeping me busy?  I’ve created a new blog for Moms of all sorts, colors, professions, in-home, out-of-home and even manly moms (aka, Dads).  It’s for us and it affirms that we as parents are God‘s masterpieces, and those children we’re raising, nurturing and loving are themselves masterpieces that God created and is still using us to fine tune.

I have a fabulous new private label customer in Elissa, owner and lead stylist at Salon E in Kinston.  Elissa and I met in April at Bee Fest in Kinston and the girls and I had the pleasure of taking a little road trip up to visit with her and discuss her spa collection needs.  How fabulous was that!  It was awesome seeing her again, and I’m so excited about the fantastic products I’m making especially for her.  When her shelves are stocked, I’ll post it so you can buy my wonderful soaps and spa treats from her.

Elissa requested two soaps that I didn’t have in stock.  Well, I have one of them in stock, but it’s a clearanced item.  Her requests were for soaps that get you going in the mornings, and I recommended peppermint and Crystal Coast Morning.  Peppermint simply uses redistilled Peppermint essential oil for an in-your-face, tingle-your-senses bathing experience.  Crystal Coast Morning packs the punch of waking up at the beach on a brisk Winter morning where the only sounds you hear are the waves kissing the sand, birds calling to one another and “ahhhh”- the sound of your first sip of coffee.  You’ll be able to get these delectable goodies from Elissa as well.

Related articles
Enhanced by Zemanta

Making Soap New School

Last month, I discovered that my Great-Grandma used to make her own soap.  Dad says that stuff would dry up poison ivy in twenty-four hours!  Yeah, it was that strong.  It shouldn’t surprise me that Grandma made her own soap.  After all, in the early 20th century, pretty much every good farm wife made soap for the family, for bathing, laundry and washing dishes.  I’m impressed, though, because not only did Grandma make her own soap, but she also made her own lye.

Still, while this was a common practice a hundred years ago and not terribly remarkable, it’s somehow thrilling to me to realize that I’ve got soapmaking in my family tree, especially a lady I loved and admired a great deal.  When Dad was over at our house a few days after telling me this, I happened to be making a batch of laundry soap in the crockpot.  This is soapmaking new school.  He remembers watching his grandma standing over a black iron pot over an open flame in the yard, stirring the soap endlessly, waiting for it to saponify (become soap).  This would take hours!  Keep in mind, a batch had to bathe all the bodies, all the clothes and all the dishes, and the larger the batch, the longer it takes to “become.” 

Now, my soaps won’t clear up poison ivy in twenty-four hours, and I have to specially formulate the batch to make it suitable for laundry.  Yes, my laundry soap will get you clean, but it’s not nearly as moisturizing as my goat’s milk soaps.  So what does “new school” look like?

Lye is bought, not made.  You can make lye by pouring water through ashes, over and over, but this makes a combination of sodium hydroxide (lye) and potassium hydroxide (potash).  I don’t have an easy source for ashes, so I just buy my lye over the Internet, or, if I’m out and desperate, at the local hardware store.

Stirring is done by a stick blender, not by hand-stirring with a wooden spoon.  Hand stirring soap can take a few hours at best with some batches.  Stirring with a stick blender takes about five minutes, max.  This spares the arms a lot of agony, plus gets the soapmaker on with life faster.

Soap can cure for longer periods.  Folks like my Great-Grandma didn’t have four-to-eight weeks to wait for soap to cure before they could use it.  It needed to be ready right then.

The crock pot has replaced the iron pot (at least in my kitchen).  Instead of adding heat by cooking the soap over an open flame, now we let the crockpot do all the work for us.  It’s not quite a matter of turning it on and forgetting about it, but it’s close.  My soap can cook in as little as 45 minutes or as long as three hours.  Either way, I’m not stirring it constantly.

So…  For what “old fashioned” thing are you grateful we have modern equivalents now?

Enhanced by Zemanta